Building platform-aware docker images from a single Dockerfile on Gitlab CI/CD

In this post I will explain how to build and push images for different platforms using a single Dockerfile and how to create a multi-platform manifest that allows Docker client to automatically pull and run the correct image for the platform.

In September 2017, Docker updated their official images to make them multi-platform aware. Docker clients will pull and run the correct Docker image for your platform whether that is x86-64 Linux, ARM or any other system with Docker. As of February 2018 the Docker client has a manifest tool that allow you to create multi-platform images yourself. The manifest tool is currently an experimental CLI feature so to be able to use it you have to enable experiment features for your Docker client. If you don’t want to do this you can also use manifest-tool as an alternative. This post will assume the Docker manifest tool.

The problem

As most of my Dockerfile‘s are quite simple and I don’t want to maintain Dockerfile‘s for every platform I was looking for a way to build my images from a single source. Another problem I had was that I wanted to be able to cross build my arm images with a gitlab-runner running on an x86_64 host.

Approach

There is an excellent blog post that explains how to run and build ARM Docker containers on a x86 host using QEMU. The post also explains how to reclaim the extra disk space used to create these kind of images, this is currently an experimental function of the Docker daemon, I won’t get into this for now.

In short you will need to install QEMU user mode and add the qemu-arm-static interpreter inside the container you want to cross build. By using a build argument you can enable cross-builds on a Dockerfile.

First install qemu:

apt-get install qemu-user qemu-user-static

Consider the following Dockerfile to create a nginx container, we will assume you are using a x86 host for building:

ARG BASE_IMAGE=debian:stretch-slim
FROM $BASE_IMAGE

COPY qemu-arm-static /usr/bin

RUN apt-get update;\
    apt-get install -y nginx;\
    echo "\ndaemon off;" >> /etc/nginx/nginx.conf

RUN rm /usr/bin/qemu-arm-static

CMD ["nginx"]

Before building the image you will need to copy qemu-arm-static to the folder your are building your image from. When you docker build this Dockerfile you will create an image for the x86 platform that runs nginx:

docker build -t nginx/linux-x86_64:latest

When we now add the arm32v7 Debian base image we can cross build an image that supports the arm platform.

docker build --build-arg BASE_IMAGE=arm32v7/debian:stretch-slim -t nginx/linux-armv7:latest

You can even run this image on your host by re-inserting qemu-arm-static:

docker run -v /usr/bin/qemu-arm-static:/usr/bin/qemu-arm-static --rm -ti nginx/linux-armv7:latest

Note that we copy the qemu-arm-static binary into the image without actually needing it. This will of course add an extra build step and grow our image. In the future we will be able to reclaim the extra space using the --squash option of docker build but for now I accept this overhead in favour of having a single Dockerfile.

Pushing the images to the server

Before we start creating the manifest let us first push these images to a Docker repository:

docker push nginx/linux-x86_64:latest
docker push nginx/linux-armv7:latest

Creating the manifest

The next step is now to create a manifest that allows the docker client to automatically select the right image for the host platform. First you will need to enable the experimental CLI features by adding "experimental": "enabled" to your Docker configuration which is located in ~/.docker/config.json. Here is mine:

{
    "experimental": "enabled"
}

Now that the experimental features are enabled we can create the manifest with the following command:

docker manifest create nginx:latest nginx/linux-x86_64:latest nginx/linux-armv7:latest

This command creates the manifest and adds the manifests of the 2 containers that we want to add. The next step is to annotate the manifest with information about target platforms and push it to the repository:

docker manifest annotate --os linux --arch amd64 nginx:latest nginx/linux-x86_64:latest
docker manifest annotate --os linux --arch amd65 nginx:latest nginx/linux/armv7:latest
docker manifest push nginx:latest

That it. Now you will be able to use the nginx:latest tag to retrieve the right image whether you hosts run on linux-x86_64 or armv7.

Continues integration using GitLab runners

It is tedious work to manually to all of this every time you need to update your container. I use GitLab for version control, issue management en CI/CD. Gitlab runners can be used to automate all sorts of build, test and deploy tasks, including building docker containers.

Once setup the Gitlab runner correctly, to enable docker-in-docker builds, you can use the .gitlab-ci.yml script below to deploy intermediate and release builds for you docker containers. The build phase needs access to qemu. I choose to download and inject it but you can also add the binary to your git repository. The script first builds and pushes the platform specific containers and finally it will create and push the platform agnostic manifest. This script pushes the images to the Gitlab intern registry but it is also possible to push to another registry including the Docker Hub.

image: docker:stable
services:
- docker:dind

stages:
- build
- manifest

variables:
  CONTAINER_IMAGE: $CI_REGISTRY_IMAGE

# Before building we need to enable the experimental features and login into the registry.
# For this I've included a temlate configuration in my project.
before_script:
  - docker info
  - mkdir -p /root/.docker || true
  - cp etc/docker-config.json /root/.docker/config.json
  - docker login -u gitlab-ci-token -p $CI_BUILD_TOKEN $CI_REGISTRY

build64:
  stage: build
  script:
    - docker build
      -t $CONTAINER_IMAGE/linux-amd64:latest
      --build-arg BASE_IMAGE=debian:stretch-slim .
    - docker push $CONTAINER_IMAGE/linux-amd64:latest

build-arm:
  stage: build
    # Download qemu static and make it executable so it can be used during the docker build phase
    - wget https://github.com/multiarch/qemu-user-static/releases/download/v2.12.0/qemu-arm-static -O qemu-arm-static
    - chmod 554 qemu-arm-static
    - docker build
      -t $CONTAINER_IMAGE/linux-arm:latest
      --build-arg BASE_IMAGE=arm32v7/debian:stretch-slim .
    - docker push $CONTAINER_IMAGE/linux-arm:latest

manifest:
  stage: manifest
  script:
    # first make sure we have the containers we use in the manifest
    - docker pull $CONTAINER_IMAGE/linux-amd64:latest
    - docker pull $CONTAINER_IMAGE/linux-arm:latest
    - docker manifest create $CONTAINER_IMAGE:latest
        $CONTAINER_IMAGE/linux-amd64:latest
        $CONTAINER_IMAGE/linux-arm:latest
    - docker manifest annotate --os linux --arch amd64
        $CONTAINER_IMAGE:latest
        $CONTAINER_IMAGE/linux-amd64:latest
    - docker manifest annotate --os linux --arch arm --variant v6
        $CONTAINER_IMAGE:latest
        $CONTAINER_IMAGE/linux-arm:latest
    # the login to the gitlab registry sometimes times out so make sure
    # we are logged on before pushing the manifest
    - docker login -u gitlab-ci-token -p $CI_BUILD_TOKEN $CI_REGISTRY
    - docker manifest push $CONTAINER_IMAGE:latest

Using the script above will automatically build and push docker containers and manifest for your project to the Gitlab internal registry. Of course you can improve the behavior of the script to build images only whenever a release version gets tagged in Git and to use the Git tag as a label for you docker container if you want to. That may be a topic for another post…

Posted in DevOps, programming | 1 Comment

XMPP versus MQTT: comparing apples with pears

Recently I had a discussion about using either XMPP or MQTT within an IoT project. One of the arguments for MQTT was that its a very efficient protocol with very little overhead where XMPP is considered very verbose.

Of course message size is only 1 aspect when choosing a protocol buts for now lets focus on message sizes.

Spoiler

MQTT is clearly the most efficient protocol on the wire. When encryption is taken into account the gap is not so big anymore. Considering all the extra functions you get from XMPP the overhead might be acceptable, depending on your use case.

Protocol Without encryption With encryption
MQTT 28 bytes 68 bytes
XMPP 491 bytes 308 bytes

XMPP pub/sub uses a transaction to publish a new item. So the publisher first sends a new item to the pubsub service and the pubsub confirms that it received the message. This is the main reason that the total number for publishing gets so large.

I noticed that subsequent XMPP requests take up less space on the wire up to the moment that the transaction takes only 180 bytes for the transaction. I guess this is the compression kicking in.

Using EXI the size of the XMPP messages can be optimised even further but as this is a relatively new XMPP extension proposal this is currently not implemented within XMPP servers (as far as I know).

The test

Lets consider a topic universe/earth (14 bytes) and a message Hello World! (12 bytes) and see what this message would take on the wire.

Since MQTT is a pure pub/sub protocol I will compare it with the pub/sub service in XMPP (which might not be the most efficient for your use case).

MQTT

Its pretty easy to determine what the message size in MQTT would be. MQTT adds a 4 bytes header to the topic and the message and the total length on the message would be 28 bytes.

  • 2 bytes for the header
  • 2 bytes for the topic length
  • 26 bytes for the message

If we want to add encryption the message would grow as encryption adds overhead. If the MQTT packet would be encrypted with TLS the overhead per packet is around 40 bytes.

The total message size of an encrypted MQTT message would be 68 bytes.

Note that I did not actually test this on the wire (yes I am lazy)

XMPP

For XMPP its a bit harder to determine the message size as it depends on encryption and compression. Lets consider the following XMPP pub/sub message:

<iq to='pubsub.servicelab.org' type='set' id='123457' xmlns='jabber:client'>
  <pubsub xmlns='http://jabber.org/protocol/pubsub'>
    <publish node='universe/earth' jid='spaceship@servicelab.org'>
      <item>
        <entry>Hello World!</entry>
      </item>
    </publish>
  </pubsub>
</iq>

Note that this message has information about the identity of the publisher. This information is lost in the MQTT message.

When removing the white space from the message the length would be 252 bytes. But what does it take on the wire?

To test this I’ve used the following:

  • A XMPP server: Prosody
  • A XMPP client: PSI
  • tcpdump to get the wire message size

The server and the client are configured to use TLS and zlib compression. On the wire this message initially will be 202 bytes. When trying to send the again (with another id) the message size will be a bit smaller: 90 bytes. I guess this is because of the stream compression.

Because XMPP pub/sub uses a request response mechanism for publishing messages to a pub/sub node so the server will send a message back to the client for each message that is published. That message will look like:

<iq type='result' to='pubsub.servicelab.org' from='spaceship@servicelab.org' id='123456'>
  <pubsub xmlns='http://jabber.org/protocol/pubsub'>
    <publish node='universe/earth'>
      <item id='ae890ac52d0df67ed7cfdf51b644e901'/>
    </publish>
  </pubsub>
</iq>

This message is 239 bytes large. On the wire it will take 138 bytes. Subsequent message with another id and item id will be around 106 bytes in size.

The total message size on the wire is initially 308 bytes for a new connection but sizes may very when a connection is kept alive longer. The total size of the XML is 491 bytes.

Comparing other functions

Above I’ve focused on comparing message sizes but what about other functions? Message size isn’t the only thing to look at when choosing a protocol. XMPP offers a lot of features that MQTT does not offer like identity, federation and all kind a extensions also specific for the IoT.

MQTT is really nice as a messaging bus in a single domain where devices belong to a single entity. I find the strength of XMPP is in the fact that it federates which make it more suitable in a multi domain, multi entities (or business roles) environment.

Posted in internet of things, machine to machine, protocols | Tagged , , , , , | 3 Comments

Smart Grid Research with the ELK Stack. You Know, For Science.

The Elasticsearch tagline is “you know, for search”. But in our case, also for science. At Servicelab, we’re using Elasticsearch, Logstash and Kibana to monitor and analyze a Smart Grid pilot. Read on for the why and how. Continue reading

Posted in Cloud computing, DevOps, internet of things | Tagged , , , , , , | Leave a comment

Installing git on windows with putty

There are many solution available for running git on your windows machine, but this is the setup that I find most useful: msysgit with putty.

  1. First download the latest putty (using the installer) and install it. If you want to download the executables directly, you also have to download plink.exe.
  2. Download the latest msysgit and install it. During installation it will ask to choose the SSH executable. If putty is installed correctly it will have detected it, otherwise you have to select the ‘Use (Tortoise)Plink’ option and use the button to select the plink executable on your system (when using the default putty installer this will be ‘C:\Program Files (x86)\PuTTY\plink.exe’).
  3. Now you can start using git and use pageant for public-private key authentication!

Continue reading

Posted in Uncategorized | Leave a comment

DevOps on Mobile

The word on the street is DevOps. There’s technology out there to make both developers’ and sysadmins’ lives easier and more intertwined, such as:

  • Containerization: packaging software in a lightweight virtualization container with a low overhead, with bonuses in maintainability and portability, and
  • Large-scale cluster management: configuration and management of thousands of servers using easy-to-use tooling and scripting,

but it’s currently exclusively focused on the let’s-call-it-the-cloud domain. So we – a very small team of network engineers, information security experts and mobile platform wizards – secured some funding from the Dutch Ministry of Defence and very limited time to do a small-scale project to see if aforementioned technologies work in the mobile domain. Continue reading

Posted in DevOps, Hardware, internet of things, Networking | Tagged , , , , , , , , | 1 Comment

Streaming audio between browsers with WebRTC and WebAudio

UPDATE (November 22, 2022): the demo page has moved from heroku to deno and is up and running again.

As an experiment I wanted to try if it is possible to stream music files from one browser to another using WebRTC. This post describes how to achieve this. I’ve published the result of my experiment as a demo web application, you’ll find the link to the demo application below.

What is WebRTC

WebRTC is a JavaScript API that enables web-developers to create real-time communication (RTC) applications. WebRTC uses peer-to-peer connections to send data between browsers, without the need for servers in the data path. WebRTC is mostly known for making audio and video calls from one browser to another, making skype-like communication possible using only browser technology.

But WebRTC has more to it that real-time communication only. Personally I believe that RTCDataChannels, that makes it possible to send arbitrary data between browsers, is the most disruptive feature WebRTC has to offer.

WebRTC explicitly does not handle signaling messages that are needed to setup a peer-to-peer connection between two browsers.

Today I want to write about using WebRTC in combination with WebAudio APIs. This article will not cover WebRTC basics like sending around the signalling, great tutorials on this alreay exist.

What is WebAudio

The is a JavaScript API for processing and synthesizing audio in web applications. It can be used for mixing, processing and filtering audio using only a webbrowser.

HTML5 ROCKS has a nice introduction on the basics of WebAudio, please go there for more details on this API.

Tying the two together

Right in the center of the WebAudio API is the AudioContext object. The AudioContext is mostly used as a singleton for routing audio signals and representation of audio object. Below is a simple example on how to play a mp3 file using the WebAudio API:

var context = new AudioContext();
function handleFileSelect(event) {
  var file = event.target.files[0];
  if (file) {
    if (file.type.match('audio*')) {
      var reader = new FileReader();
      reader.onload = (function(readEvent) {
        context.decodeAudioData(readEvent.target.result, function(buffer) {
          // create an audio source and connect it to the file buffer
          var source = context.createBufferSource();
          source.buffer = buffer;
          source.start(0);
          // connect the audio stream to the audio hardware
          source.connect(context.destination);
        });
      });
      reader.readAsArrayBuffer(file);
    }
  }
}

This code will make a mp3 file, selected using a file input element, play over the audio hardware on the host computer. To send the audio stream over a WebRTC connection we’ll have to add a few extra lines of code:

var context = new AudioContext();
// create a peer connection
var pc = new RTCPeerConnection(pc_config);
function handleFileSelect(event) {
  var file = event.target.files[0];
  if (file) {
    if (file.type.match('audio*')) {
      var reader = new FileReader();
      reader.onload = (function(readEvent) {
          context.decodeAudioData(readEvent.target.result, function(buffer) {
            // create an audio source and connect it to the file buffer
            var source = context.createBufferSource();
            source.buffer = buffer;
            source.start(0);
            // connect the audio stream to the audio hardware
            source.connect(context.destination);
            // create a destination for the remote browser
            var remote = context.createMediaStreamDestination();
            // connect the remote destination to the source
            source.connect(remote);
            // add the stream to the peer connection
            pc.addStream(remote.stream);
            // create a SDP offer for the new stream
            pc.createOffer(setLocalAndSendMessage);
          });
        });
      reader.readAsArrayBuffer(file);
    }
  }
}

I’ve tried playing the audio on the receiving side using the WebAudio API as well but this did not seem to work at the time of writing. So for now we’ll have to add the incoming stream to an <audio/> element:

function gotRemoteStream(event) {
  // create a player, we could also get a reference from a existing player in the DOM
  var player = new Audio();
  // attach the media stream
  attachMediaStream(player, event.stream);
  // start playing
  player.play();
}

And we’re done.

Demo

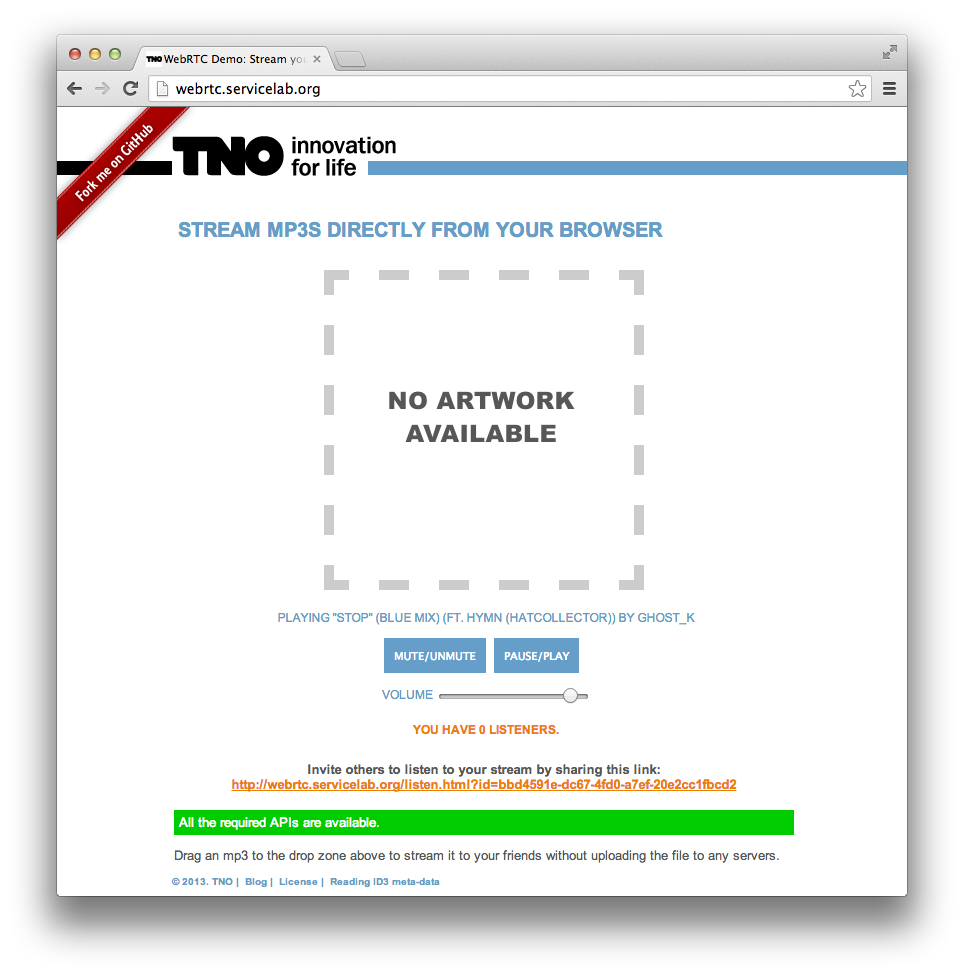
Screenshot of the demo application

Screenshot of the demo application

Building upon this example I’ve created a demo web application (requires Chrome) to show this functionality. The demo basically uses the example above but it connects the audio stream for local playback to a GainNode object so the local audio volume can be controlled. The demo application allows you to play an mp3 file from a webpage and let others listen in. On the listener page the music is played using an <audio/> element. The listener page also receives some id3 meta-data using an RTCDataChannel connection. Finally the listener page displays the bit-rate of the music stream that is played.

The demo application has a few loose ends:

  • Currently it only works on Chrome (mainly because it plays mp3s)
  • On the receiving side it doesn’t use the WebAudio API for playing the audio
  • There is static on the line when the audio stream is paused. I haven’t been able to detect, on the receiving side, without signaling, if a stream is removed.
  • The audio quality is quite poor, the audio stream has a bit rate of around 32kbits/sec, increasing the bandwidth constrains does not seem to influence the audio stream yet.

It is good to see that WebRTC and WebAudio are playing together quite nicely. In the future it will be possible to expand on this concept and create all kinds of cool applications like for example sending a voice message when a user isn’t available to accept a WebRTC call or a DJ-ing web application where others can listen in on!

Posted in programming, telecommunications, web | Tagged , , , , , , , | 17 Comments

XMPP Service Discovery extensions for M2M and IoT

Within the Webinos project we have investigated if we could use XMPP as the signalling protocol. Although it was decided by the Webinos project not to use XMPP in Webinos we believe we’ve made some interesting observations and solutions for some of the problems we’ve encountered in our investigation.

We presented our findings in the Jabber dev-room on FOSDEM’13 and got some interesting feedback from the Guru’s present.

In this blogpost we want to share our insights upon service discovery and invocation in XMPP which we believe are very well applicable onto machine-to-machine communications and the Internet-of-Things.

About Webinos

If you would like to know what Webinos is all about I suggest that you watch this short film that describes Webinos quite well. But to summarize: Webinos is about sharing device capabilities with applications running of different devices. For instance one can have an application running on a thermostat at home that uses the GPS capabilities of a car to track if your home should be heated or not.

One of the requirements is that a device can have multiple instances of the same capability, for example a smartphone has an internal GPS sensor but can also pair with a Bluetooth GPS sensor that has better accuracy, hence the GPS service would have 2 instances on this device.

XMPP to the rescue

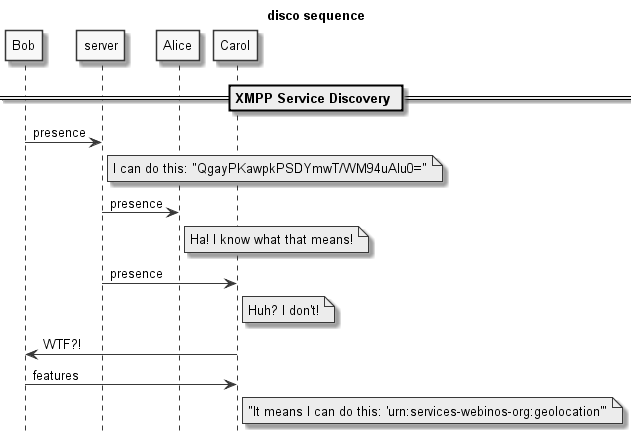
XMPP has some great out-of-the-box features that we could use to discover services. For example XMPP Service Discovery (XEP-0030) and XMPP Entity Capabilities (XEP-0115). These mechanisms works as described in the call flow shown below:

disco

Bob publishes his presence state to the server and the server propagates his presence state to all his subscribers. Encoded in his presence message is a hash based upon his device capabilities, it is unique for every state, so if a capability gets added or removed the hash will change. If a receiving node does not know what the hash means, that node can ask Bob’s device for more information. The receiving node can that cache that information using the hash it received earlier. Note that all of Bob’s own devices are also subscribed on his presence so each of his devices will receive the presence updates of his other devices.

Looking at the wire protocol this looks like this:

<presence from="someone@servicelab.org/mobile">
  <c xmlns="http://jabber.org/protocol/caps" 
      hash="sha-1"
      node="http://webinos.org/android"
      ver="QgayPKawpkPSDYmwT/WM94uAlu0="/>
</presence>

The ver attribute holds the hash that is generated using the capabilities of someone’s mobile device. The message is send to the server and received by someone’s TV. The TV is unaware of the meaning of the hash and requests additional information:

<iq from="someone@servicelab.org/tv" 
    id="discodisco"
    to="someone@servicelab.org/mobile" 
    type="get">
  <query xmlns="http://jabber.org/protocol/disco#info"
      node="http://webinos.org/android#QgayPKawpkPSDYmwT/WM94uAlu0="/>
</iq>

This message tells someone’s mobile that someone’s TV wants to know what the hash code means. Someone’s mobile will answer the message:

<iq from="someone@servicelab.org/mobile" 
    id="discodisco"
    to="someone@servicelab.org/tv" 
    type="result">
  <query xmlns="http://jabber.org/protocol/disco#info"
      node="http://webinos.org/android#QgayPKawpkPSDYmwT/WM94uAlu0=">
    <identity category="client" name="Webinos for Android vX.X.X" type="mobile"/>

    <feature var="urn:services-webinos-org:geolocation"/>
    <feature var="urn:services-webinos-org:geolocation"/>

  </query>
</iq>

In this case the hash code means that there are 2 instances of the geolocation service available on someone’s mobile. But how can someone’s TV differentiate between the 2 services? Currently in XMPP it is possible to add additional information about a service in the message (XEP-128) but it does not has the possibility to differentiate between multiple services within the same namespace. The nice thing about XMPP is that you can extend it… And that is exactly what we did:

<iq from="someone@servicelab.org/mobile" 
    id="discodisco"
    to="someone@servicelab.org/tv" 
    type="result">
  <query xmlns="http://jabber.org/protocol/disco#info"
      node="http://webinos.org/android#QgayPKawpkPSDYmwT/WM94uAlu0=">
    <identity category="client" name="Webinos for Android vX.X.X" type="mobile"/>

    <feature var="urn:services-webinos-org:geolocation">
      <!-- new stuff -->
      <instance xmlns="webinos:rpc#disco" id="gps1">
        <displayName>Internal GPS</displayName>
        <description>Internal GPS sensor</description>
        ...
      </instance>
      <!-- back to normal --->
    </feature>

    <feature var="urn:services-webinos-org:geolocation">
      <instance xmlns="webinos:rpc#disco" id="gps2">
        <displayName>Bluetooth GPS</displayName>
        <description>Bluetooth GPS sensor</description>
        ...
      </instance>
    </feature>

  </query>
</iq>

We added an instance element to each of the feature elements. The instance element holds the identifier for each service instance and hold some additional information about the service. The additional information can be extended with extra information about the service, like for example the accuracy of the GPS device.

Service invocation

Because someone’s TV is now aware of the location services on someone’s mobile it can now choose which of these service instances it want to invoke.

Since webinos is all about web technologies we’ve chosen not to use XMPP RPC (XEP-0009) but to transport JSON RPC payloads over XMPP.

<iq from="someone@servicelab.org/tv"
    id="rpc1"
    to="someone@servicelab.org/mobile"
    type="get">
  <query xmlns="urn:services-webinos-org:geolocation">
    <payload xmlns="webinos:rpc#invoke" id="gps1">
      { "method": "getCurrentPosition"
      , "params": {}
      , "id": "rpc1"
      }
    </payload>
  </query>
</iq>

The request is than answered by someone’s mobile:

<iq from="someone@servicelab.org/mobile"
    id="rpc1"
    to="someone@servicelab.org/tv"
    type="result">
  <query xmlns="urn:services-webinos-org:geolocation">  
    <payload xmlns="webinos:rpc#result" id="gps1">
        { "result":
          { "coords":
            { "latitude": 52.5
            , "longitude": 5.75
            }
          , "timestamp": 1332410024338
          }
        , "id": "rpc1"
        , "callbackId": "app1"
        }
    </payload>
  </query>
</iq>

Feedback

As mentioned above we’ve presented our idea in the Jabber dev-room on FOSDEM. The initial feedback we got from the XMPP Guru’s that were in the room was that XMPP Service Discovery disco#info feature we extended is about getting information about what exactly a node is capable of. One could than use disco#items to discover the instances of the feature.

The problem we have with that approach is that the disco#items are not used to create the version hash as described in the Entity Capability XEP. So if a service instance goes away but another instance of the same service is still presence the presence information of that node would not change and other node’s would not be notified about the change. This could be a problem in a situation were someone’s TV would have an accuracy requirement on the GPS service instance it wants to use. An example:

  • Someone’s mobile has one location service available. It has an accuracy of 30 meters.
  • To notify other devices about this feature is sends out a presence update with version hash 123.
  • Someone’s TV gets the details that belong to version hash 123 and uses disco#items to query for the instances of the location services. The single service that is present is not accurate enough for someone’s TV as the application that is running there needs an accuracy of 10 meters.
  • Someone pairs a Bluetooth GPS device with an accuracy of 10 meters with his mobile. The disco#items of someone’s mobile change but the feature list stays the same, so the version hash will stay 123 and the presence state would not have to updated.
  • Someone’s TV would never be aware of the fact that his service requirements are now met because someone’s mobile feature set is still the same.

Conclusion

The approach we’ve chosen for service discovery proved to work quite well with our requirements but XMPP flexibility makes other solutions to the same problem viable as well.

Posted in domotica, internet of things, machine to machine, Networking, programming, protocols, telecommunications | Tagged , , , | 2 Comments

Installing a Storm cluster on CentOS hosts

Storm is a distributed, realtime computation system to reliably process unbounded streams of data. The following picture shows how data is processed in Storm:

storm-processing

This tutorial will show you how to install Storm on a cluster of CentOS hosts. A Storm cluster contains the following components:

storm-cluster

Nimbus is the name for the master node. Nimbus is responsible for distributing code around the cluster, assigning tasks to machines, and monitoring for failures. The nodes that perform the work contain a supervisor and each supervisor is in control of one or more workers on that node. ZooKeeper is used for coordination between nimbus and the supervisors.

All nodes

We start with disabling SELinux and iptables on every host. This is a bad idea if you are running your cluster on publicly accessible machines, but makes it a lot easier to debug network problems. SELinux is enabled by default on CentOS. To disable it, we need to edit /etc/selinux/config:

SELINUX=disabled

We need to reboot the machine for this to take effect.

The firewall has some default rules we want to get rid of:

iptables --flush
iptables --table nat --flush
iptables --delete-chain
iptables --table nat --delete-chain
/etc/init.d/iptables save

Storm and ZooKeeper are both fail-fast systems, which means that a Storm or ZooKeeper process will kill itself as soon as an error is detected. It is therefore necessary to put the Storm and ZooKeeper processes under supervision. This will make sure that each process is restarted when needed. For supervision we will use supervisord. Installation is performed like this:

rpm -Uvh http://download.fedoraproject.org/pub/epel/6/i386/epel-release-6-8.noarch.rpm
yum install supervisor

ZooKeeper node

We will now create a single ZooKeeper node. Take a look at the ZooKeeper documentation to install a cluster.

yum -y install java-1.7.0-openjdk-devel wget
cd /opt
wget http://apache.xl-mirror.nl/zookeeper/zookeeper-3.4.5/zookeeper-3.4.5.tar.gz
tar zxvf zookeeper-3.4.5.tar.gz
mkdir /var/zookeeper
cp zookeeper-3.4.5/conf/zoo_sample.cfg zookeeper-3.4.5/conf/zoo.cfg

Now edit the zookeeper-3.4.5/conf/zoo.cfg file:

dataDir=/var/zookeeper

Edit the /etc/supervisord.conf file and add a section about ZooKeeper to it:

[program:zookeeper]
command=/opt/zookeeper-3.4.5/bin/zkServer.sh start-foreground
autostart=true
autorestart=true
startsecs=1
startretries=999
redirect_stderr=false
stdout_logfile=/var/log/zookeeper-out
stdout_logfile_maxbytes=10MB
stdout_logfile_backups=10
stdout_events_enabled=true
stderr_logfile=/var/log/zookeeper-err
stderr_logfile_maxbytes=100MB
stderr_logfile_backups=10
stderr_events_enabled=true

Start the supervision and thereby the ZooKeeper service:

chkconfig supervisord on
service supervisord start

Running the supervisorctl command should result in something like this:

zookeeper      RUNNING    pid 1115, uptime 1 day, 0:07:33

Nimbus and Supervisor nodes

Every Storm node has a set of dependencies that need to be satisfied. We start with ZeroMQ and JZMQ:

yum -y install gcc gcc-c++ libuuid-devel make wget
cd /opt
wget http://download.zeromq.org/zeromq-2.2.0.tar.gz
tar zxvf zeromq-2.2.0.tar.gz
cd zeromq-2.2.0
./configure
make install
ldconfig

yum install java-1.7.0-openjdk-devel unzip libtool
export JAVA_HOME=/usr/lib/jvm/java-1.7.0-openjdk-1.7.0.9.x86_64
cd /opt
wget https://github.com/nathanmarz/jzmq/archive/master.zip
mv master master.zip
unzip master.zip
cd jzmq-master
./autogen.sh
./configure
make install

Then we move onto Storm itself:

cd /opt
wget https://github.com/downloads/nathanmarz/storm/storm-0.8.1.zip
unzip storm-0.8.1.zip
mkdir /var/storm

Now edit the storm-0.8.1/conf/storm.yaml file, replacing the IP addresses as needed:

storm.zookeeper.servers:
 - "10.20.30.40"
nimbus.host: "10.20.30.41"
storm.local.dir: "/var/storm"

Finally we edit the supervision configuration file /etc/supervisord.conf:

[program:storm_nimbus]
command=/opt/storm-0.8.1/bin/storm nimbus
autostart=true
autorestart=true
startsecs=1
startretries=999
redirect_stderr=false
stdout_logfile=/var/log/storm-nimbus-out
stdout_logfile_maxbytes=10MB
stdout_logfile_backups=10
stdout_events_enabled=true
stderr_logfile=/var/log/storm-nimbus-err
stderr_logfile_maxbytes=100MB
stderr_logfile_backups=10
stderr_events_enabled=true

[program:storm_ui]
command=/opt/storm-0.8.1/bin/storm ui
autostart=true
autorestart=true
startsecs=1
startretries=999
redirect_stderr=false
stdout_logfile=/var/log/storm-ui-out
stdout_logfile_maxbytes=10MB
stdout_logfile_backups=10
stdout_events_enabled=true
stderr_logfile=/var/log/storm-ui-err
stderr_logfile_maxbytes=100MB
stderr_logfile_backups=10
stderr_events_enabled=true

And start the supervision:

chkconfig supervisord on
service supervisord start

Running the supervisorctl command should result in something like this:

storm_nimbus   RUNNING    pid 1119, uptime 1 day, 0:20:14
storm_ui       RUNNING    pid 1121, uptime 1 day, 0:20:14

The Storm UI should now be accessible. Point a webbrowser at port 8080 on the Nimbus host, and you should get something like this:

storm-ui

Note that the screenshot also shows an active topology, which will not be available if you just followed the steps in this tutorial and haven’t deployed a topology to the cluster yet.

Posted in Cloud computing, programming | Tagged , , | Leave a comment

Installing Apache Libcloud on CentOS

Apache Libcloud is a standard Python library that abstracts away differences among multiple cloud provider APIs. At the moment it can be used to manage four different kinds of cloud services: servers, storage, loadbalancers and DNS. Here are the steps to install Libcloud on a machine running CentOS 6:

rpm -Uvh http://download.fedoraproject.org/pub/epel/6/i386/epel-release-6-8.noarch.rpm
yum install python-pip
pip-python install apache-libcloud

The first step installs the Extra Packages for Enterprise Linux (EPEL) repository. This repository contains the pip command, which is a package manager for Python. If you want to deploy nodes on the different clouds, you need an additional package:

yum install gcc python-devel
pip-python install paramiko

The paramiko package adds SSH capabilities to Python and allows the Libcloud library to SSH into your nodes and perform initial configuration.

Posted in Cloud computing, programming | Tagged , | 2 Comments

Building applications for health devices with Antidote and NodeJS

In this post I will explain how to build health apps that use Continua Health Alliance certified health devices with NodeJS. To communicate with these devices I am using the D-Bus health service from the open source Antidote IEEE 11073 stack library. Signove, the authors of the Antidote library, did excellent work creating an open source software stack that can be used to develop health applications. They provided good developer documentation (PDF) that helped me a lot to get things working.

Please note that the IEEE 11073 specificationis not an open specification. You can purchase the specification at IEEE. Without this information it is difficult to build an application since all of the device and attribute definitions are defined in this specification. Searching the web may, or may not, help you to get along without the specifications…

Setup

Roughly my setup breaks down into 3 components:

Overview

The Antidote Health Service handles all communications with the health devices. I’ve only managed to get Antidote running on Linux but it supports more platforms, please refer to their documentation for more info on this.

My health application itself is written for NodeJS and uses node-dbus to communicate with the Antidote Health Service. There are a couple of D-Bus modules available for NodeJS but node-bus was the only one that worked for me. I did not have prior experience with D-Bus programming and not all of the examples included with node-dbus made sense to me. I spend quite some time figuring out how to communicate with the Health Service via D-Bus. The python example, included in the Antidote software helped me out quite a lot.

As for the health device: I tested my setup using a Continua Certified Omron body composition monitor(or, as you prefer: a weighing scale…).

Tying it together

To be able to use the health service, an object should be registered on the dbus that will listen to messages of the health service. The code fragments below show how this can be done.

First, require the dependencies and make some definitions.

var dbus = require("dbus");
var xpath = require('xpath');
var dom = require('xmldom').DOMParser;

// data type of a body weight scale device
var BODY_WEIGHT_SCALE = 0x100f;

// metric id for body mass measurement
var MDC_MASS_BODY_ACTUAL = 57664;

As I mentioned above node-dbus is used to communicate with the Health Service. The xpath and xmldom modules are used to parse the information that is received from the weighing scale. The weighing scale’s data type is defined by an integer defined in BODY_WEIGHT_SCALE. The information from a measurement event is received in an XML document. Within the XML document the body mass (weight) is identified by the value of MDC_MASS_BODY_ACTUAL.

The following code fragment shows how to start using the dbus and configure dbus for using it with the health service.

dbus.start(function() {
  var bus = dbus.system_bus();
  var manager;

  try {
    manager = dbus.get_interface(
      bus,
      "com.signove.health",
      "/com/signove/health",
      "com.signove.health.manager"
    );
  } catch (err) {
    console.log('Is the healthd process running?');
    process.exit(1);
  }

When the reference to the manager interface of the health manager is made, the health application can register itself as a listener to the health service. The code below shows how this is done.

First we get a reference to the dbus registration mechanism and request a name on the dbus, in this case the name is org.servicelab.healthapp. Then a name is created for the object we are going to register, to make the name unique the process id of the currently running process is used.

Then the methods that will be listened to are defined in the Methods object. All messages that are received from the health service will generate callbacks to functions that are defined in this object. An example of the Methods object will be given below.

The Methods object is registered at the dbus using the objectName. The Methods object will implement the com.signove.health.agent interface.

  var register = new dbus.DBusRegister(dbus, bus);
  dbus.requestName(bus, 'org.servicelab.healthapp');
  var objectName = '/org/servicelab/healthapp/' + process.pid;

  var Methods = { // ... };

  register.addMethods(
    objectName,
    'com.signove.health.agent',
    Methods
  );

  manager.ConfigurePassive(objectName, [BODY_WEIGHT_SCALE]);

This concludes the registration of the listener. Only the Methods object needs to be implemented to get things working. The interface of this object is documented in Antidote’s documentation. Not all methods are implemented and the Continua device that I used did not support all features either. The code example below shows how to the device attributes of the device that is connecting and how to get the measured weight from the measurement data.

var Methods = {
  Connected: function(device, address) { },
  Associated: function (device, xmldata) {
    device = dbus.get_interface(
      bus,
      'com.signove.health',
      device,
      'com.signove.health.device'
    );
    device.RequestDeviceAttributes();
  },
  MeasurementData: function(device, xmldata) {
    var doc = new dom().parseFromString(xmldata);
    var weight = parseFloat(
      xpath.select("//meta-data[meta='" + MDC_MASS_BODY_ACTUAL + "']/../simple/value/text()", doc)
    );
    console.log('Measured weight is: ' + weight);
  },
  DeviceAttributes: function(device, xmldata) {
    console.log(xmldata);
  },
  Disassociated: function(device) { },
  Disconnected: function(device) { },
  PMStoreData: function(device, handle, xmldata) { },
  SegmentInfo: function (device, handle, xmldata) { },
  SegmentDataResponse: function(device, handle, segment, response) { },
  SegmentData: function(device, handle, segment, xmldata) { },
  SegmentCleared: function(device, handle, segment, xmldata) { }
};

When the device becomes associated with the health service the Associated function gets called. Within this function the device can be queried for its attributes. The device will answer this request using the DeviceAttributes functions. The device attributes are passed to this function as an XML document.

Measurement data will be delivered to the application via the MeasurementData function. The measurement data is in XML format. In the above example is shown how to get the weight from a measurement using an XPath query.

Gist

The source code is also available as gist.

This configuration is used in a demonstrator of the Figaro project which demonstrates how IP-based and non-IP based home networks can be converged (PDF). This demonstrator is shown in the IEEE booth on the CES coming January.

Posted in programming | Tagged , , , , , , , , , | 5 Comments